
Lego ev3 Control Panel
The ev3 Control Panel is a program you can use to remotly control your Lego EV3 robot. You can run the ev3 Control Panel on your Raspberry Pi and drive your Lego robot with an Xbox 360 controller joystick. You can also hook up some simple circuits with LEDs and make the lights respond to the robot’s sensor readings.
The ev3 Control Panel is written in C#. It runs on Windows, Mac, and Linux.
We welcome contributors to work on this project and make our simple program even more awesome. Please consider looking at the issue tracker for a list of know defects and feature improvement suggestions. Feel free to add your own feature suggestions to the database.
Getting Started
To use your Raspberry Pi to control your EV3 robot, you will need:
- A Raspberry Pi computer with a Wi-Fi dongle.
- We have tested with model B, B+ and model 2
- An operating system on a SD card.
- Get the PiWiFi Control disk image from our Google drive folder here to use your Pi as an access point ready to connect to your robot. For more details, see www.littlebytesofpi.com/raspberry-pi.
- A Lego EV3 robot with a Wi-Fi dongle
- We use the Wi-Fi dongle recommended by Lego.
- If you want to drive your robot with a joystick, you will need a wired Xbox 360 controller, or a wireless controller with a USB adapter.
- We tried this usb adapter and it worked plug and play with our Raspberry Pi.
This 5 minute video demonstrates how to get started with Pi Wi-Fi Control operating system version of the ev3CPanel program.
You can get the ev3CPanel by itself for the Raspberry Pi. Download the program files from our Google drive and unzip them into a folder on your Pi. This will also work for other Linux operating systems.
Note, you must install Mono 3.2.x or higher to run the program.
You can get the ev3CPanel for Windows PC. Download the program files from our Google drive and unzip them into a folder on your PC.
Note: The Windows version of the program can connect to the robot using USB, Bluetooth, or Wi-Fi. The Windows version of the program does not support Xbox controller input, but it does support the Wiimote (although it is somewhat unstable, so good luck).
Build it Yourself
You can also build the program yourself. Get the source code from our git repository, and use Visual Studio 2015 Community Edition on Windows (it’s free), or MonoDevelop on Linux (it’s also free) to build the program on your own computer.
Connecting to your Robot
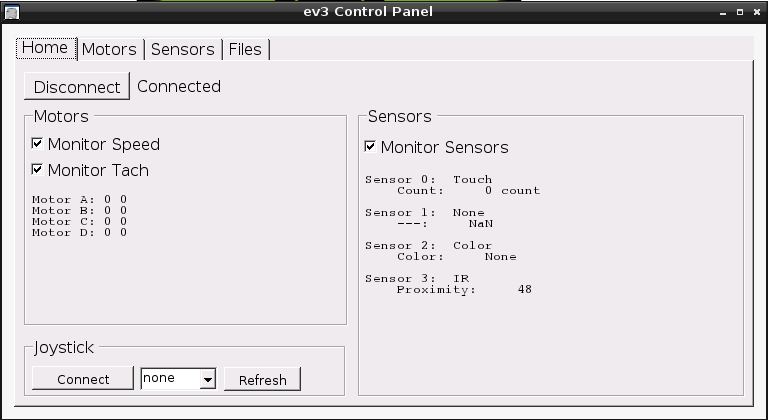
Navigate to the folder where you installed the program files, and double click on the ev3CPanel.exe icon. The program will start up on the Home tab.
The program can connect to an EV3 robot using the USB cable, bluetooth, or Wi-Fi. To use the Wi-Fi connection, you must have an extra Wi-Fi dongle to plug into the Lego EV3 robot. The officially recommended WiFi dongle for the Lego EV3 is the NETGEAR N150 Wireless Adapter (WNA1100). However, there are numerous posts on the internet about how to get other dongles to work if you are up for an adventure.
Tap the Connect button and choose a connection method.

Note: The Raspberry Pi build of the program is configured to connect using Wi-Fi only. You will not see the connect prompt, and it will try to connect to the robot over Wi-Fi automatically .
Once the robot is connected, the control panel will begin to display information about the motors and the sensors.
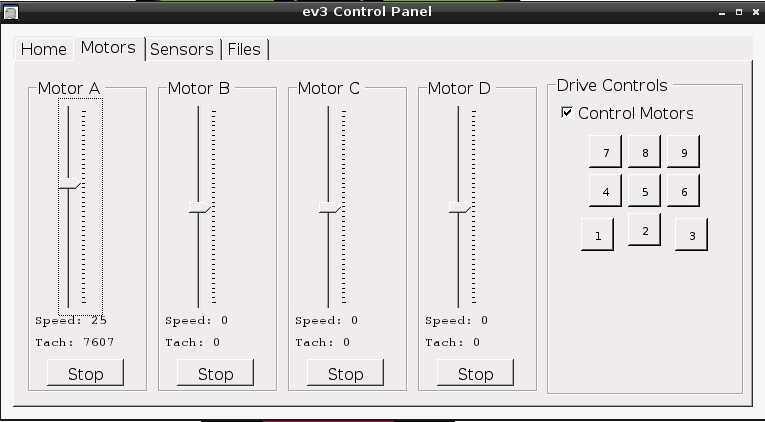
Use the Motors tab to see the motor status, or to control individual motors with the slider controls.
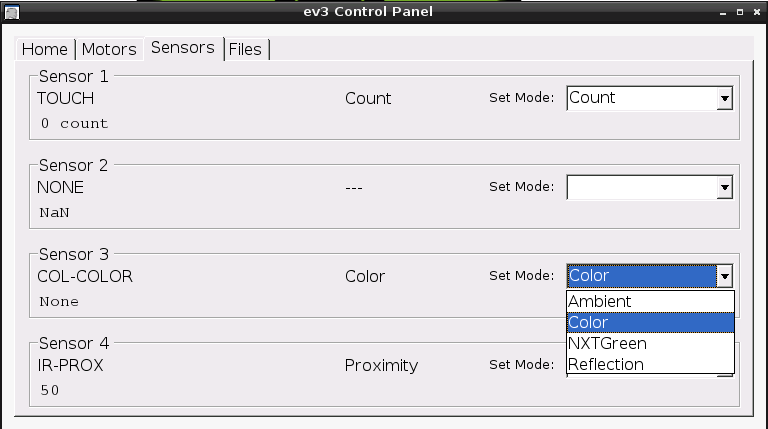
Use the Sensors tab to see the sensor status, or to change the mode of any of the connected devices.
Use the Files tab to launch available programs on the robot. You can create a program with the Lego EV3 software, download it onto the robot, and then start your program with the ev3 Control Panel.

Driving the Robot
Once connected, you can drive the robot using the Motors tab buttons, the keyboard, or an Xbox controller joystick.
Note: The program is hard coded to use the ‘standard’ configuration for large and small motors. The left and right driving motors should be plugged into ports B and C. The small motor should be plugged into port A.
To use the buttons or the keyboard:

- Forward: 8 / W
- Back: 2 / X
- Left: 4 /A
- Right: 6 / D
- Spin Left: 7 / Q
- Spin Right: 9 / E
- Stop: 5 / S
- Motor A +: 3 / C
- Motor A -: 1 / Z
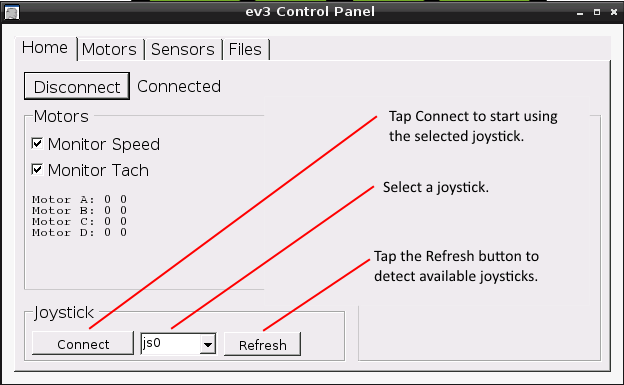
To use a joystick, go to the Home page, plug in an Xbox controller and hit the Refresh button. You should be able to select the joystick as “js0”. If you have more than one joystick device plugged into the Raspberry Pi, select the appropriate device.
Note: Only the Linux version of this program supports Xbox controller input. The Windows version of this program has support for Wiimote input, but the connection is tricky, and the implementation is not well tested.
Xbox Controller Layout:
The Xbox controller can be used in one of two modes. Right Stick or track steering.
In right stick mode:
- Use the right stick to drive forward, left, right, or reverse.
- A Button: Turn the motor -140 degrees (precisely open the claw)
- B Button: Turn the motor +140 degrees (precisely close the claw)
In track steering mode:
- Left Stick: Left track forward and back
- Right Stick: Right track forward and back.
- A Button: Increase motor A speed by 10
- X Button: Decrease motor A speed by 10
In both modes:
- Y Button: Switch between track steering and right stick steering mode.
- Start Button: Change ev3 Control Panel tab to the right
- Back Button: Change eve Control Panel tab to the left
- DPad Up / Down: Scroll through available files (when Files tab is visible)
- DPad Right: Start the selected program (when Files tab is visible)
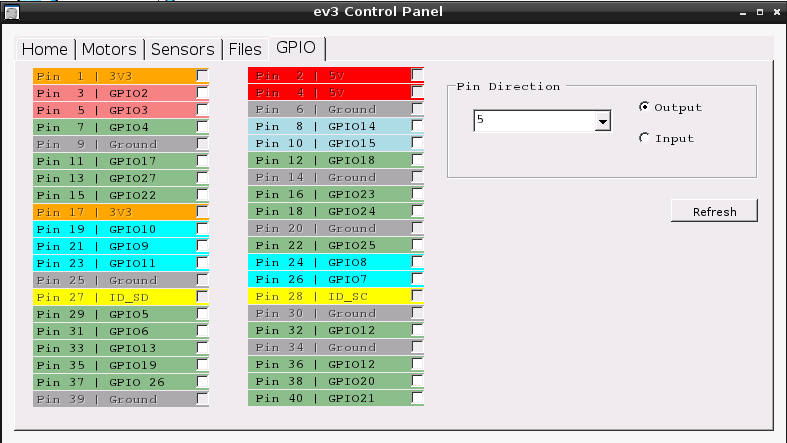
GPIO Control
The ev3 Control Panel software running on the Raspberry Pi is able to control the GPIO pins with a simple user interface.
For an example of what you can do by combining the Lego robot with GPIO pins, see our description of the ev3.NET sensor display we created to teach kids more about how robots can move around autonomously by sensing their surrounding environment.